a simple, non-PC sampling trigger footswitch setup
Moderators: Sharp, X-Trade, Pepperpotty, karmathanever
-
shanghaitang
- Posts: 14
- Joined: Mon Apr 25, 2011 5:28 am
Yes, I also would be immensely interested in seeing this mod in action - the microsampler might be the midi capable battery powered live looper of the gods! One thing I am worried about, I have heard it said that after your loop is recorded there is no automatic starting of the loop - how do you work around that and keep the flow? Is it possible to have one or more drum loops held, then sample new loops on to different keys in real time, without the click track? Also, without being able to mute the line in after making a loop, do you have issues with phasing?
I would really love for this thing to be workable - I'll sell a kidney and get me one STAT!
Thanks for all your help.
I would really love for this thing to be workable - I'll sell a kidney and get me one STAT!
Thanks for all your help.
sorry for delayed response, been away from this forum for a while.
so far as why i wanted footswitch control: great thing if you're recording guitar / bass / synth samples and need both hands to play the instrument in question.
so far as auto-looping, yes the microsampler will auto-loop IF you take a little time to set things up in advance. it's a workaround, but a pretty functional one, see video below.
Last edited by orchards on Thu Jul 07, 2011 8:03 am, edited 1 time in total.
since there seems to be some interest in this mod and the complimentary looping technique required to turn the MC into a wicked looper, went ahead and made a tutorial type video to show you guys how it all goes down:
http://www.youtube.com/watch?v=guJR-WxaTSY
as mentioned in the video description you only have to do this setup step thoroughly once and then you can save / copy the resulting pattern as a template for future use, allowing turn on + instantly start looping functionality.
someday i'll have to make a video showing the kind of stuff i actually do with this instead of just explaining it, but thought this would be more helpful in the meantime :)
anyways no doubt there's still plenty of inspiring workflows awaiting exploration considering we can combine the demonstrated technique with realtime resampling / interesting effects tweakage / keyboard mode.
Re: SUPER-HARDWARE SOLUTION
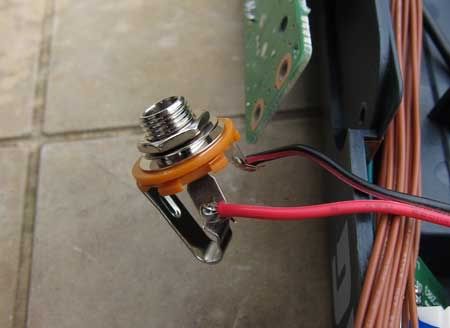
Anyone know the type of wire (gauge) to use when connecting the sample button to the 1/4'' jack, I don't know if it matters a whole lot for this purpose, but I don't know much about electrical tinkering...orchards wrote:
and the jack connection at the other end :
Also, anyone know where I should put wires on the Loop Hold/Tap Tempo buttons? They're different than the sample button, which was very well described in the thread (read earlier).

Please give me detailed information, and thank you.
Re: SUPER-HARDWARE SOLUTION
nique wrote: Graham, aka gmeredith was kind enough to shine some light and help me out. Here are his responses via private message:
From: gmeredith
Hi! The wire can be as simple as a guitar lead - probably best anyway because it is shielded and protects against hum and interference on the triggering. So pretty much any thin guage "hookup" wire, but to make it easy, just butcher a guitar lead and either solder the bare wires on on end onto the circuit board, or put a jack in the sampler casing and then just plug into that - in that case, the wire is just plain hookup wire - 1-2mm - it actually doesn't matter if it's thicker.
Cheers, Graham
From: gmeredith
Hi nique,
Yes, feel free to post my replies. Ths hold button is different. Don't solder any wires to those circular copper tracks - the button presses on those, and any solder on them will stop them from being completely flat and making proper contact with the button.
Instead, solder the wires to the end tracks of those circular tracks that end in straight bits and a little end knob. Make the solder joint as small and as neat as you can, and have thee wires pressed as flat against the board as possible. Check this though first by seeing how the buttons press onto the tracks first, to see if even this way would obstruct the buttons.
The ideal way would be to solder the wires to the other side of the board, if you can follow the connections through from those circles to where they pass through the board with little holes and come out the other side.
Cheers, Graham